Wednesday, December 21, 2011

Commemorating a Little Boy


This delightful little pendant was custom made to commemorate the coming of a little boy.  It is pierced entirely by hand out of 18k yellow gold. All the edges were smoothed and rounded, to give a nice flowing look.

Monday, December 5, 2011

My new website - come and visit!

Things are looking a bit dusty in the blog lately. I can't believe I haven't been around for 2 months! First, my computer died (RIP, dear one), the replacement took 2 weeks to arrive (agh! But welcome, new computer), then sales, my parents are moving from a different state, and and and... Everything piled up, as life sometimes does.

But the biggest time drain is also one of the most excitings: I have a new jewelry site! It is all mine, I can do a lot more with it and it is new and shining. Please drop by and visit me: www.beatrizfortes.com. I am strangely excited by the fact that I now have my own domain, with my own name.

I know I owe a couple of posts on talent (and there are some very interesting comments to answer, from the first post). I promise I will get back to this topic as soon as life has quieted down a bit.

Saturday, October 1, 2011

Talent or Hard Work?

I am lucky to belong to several communities of great craftspeople, like The Artisan Groupthe Aspiring Metalsmiths and Handmadeology. Through these communities as well as Etsy and a myriad of sites I have bookmarked over the years, I see a lot of beautiful handmade items, from ceramics to woodwork and everything in between. Often, when I see a particularly nice item, I think "What talent!".

Recently, I have become more and more unsatisfied with this simple reaction. It boils all the creative process to one variable: talent. What about hard work, experience, self editing, research and education?

I sincerely believe that most people can, with hard work, dedication and good instructions, create a decent, basic example of almost anything. Almost, because no matter what, this author cannot yield a needle or sewing machine. And, with time and practice, we can all be very good at a variety of activities.

On the other hand, we all know people who have a brilliant talent, who seems to be magically able to create beautiful things. Yet, how sad it is when these talented folks don't work to develop themselves. Like a brilliant student, who does just enough work to scrape by at the end of the year.

But when you join natural talent with hard work - oh boy! Great things happen.

So don't really only on your natural talent - develop. And don't let a lack of talent stop you - you may just find out that you did, indeed, have it in you all along.

Please share your thoughts on this subject! I want to write a couple more blog posts on talent and hard work and I would appreciate hearing what you have to say. And if you would like to share specific examples of these, I will gladly incorporate the pictures (this post seems a bit bare, doesn't it?)

Friday, September 23, 2011

Muse, oh Muse!

It is once again time for the Aspiring Metals Team blogroll and the topic chosen was Inspiration - what inspires us and where do we get our inspiration.

Inspiration is such a fleeting thing. Sometimes, it is just a spark of an idea, which you have to battle out in your mind and on paper, until it takes on a complete and workable form. At others, a piece will come up in my mind, with all details and ready to be made at the bench. There are times when my imagination seems to be racing and ideas will spontaneously pop up at the oddest times. At others, nothing seems to happen.

Since I want to make my living as an artist, the second situation is very worrying. I am actively trying to develop a consistent artistic vision (won't that sound good on my artist's statement?). I find that the more I work, sketch, look for unusual shapes and colours and go through life conscientiously, the more easily inspiration comes. If I slack off, then I can easily fall into a rut.

A support network, where I can bounce ideas and get feedback, is also very important to me (like my wonderful team that inspired this post). Sitting down and making things help me focus and figure out what works and what doesn't. And, since I am an engineer, figuring out good proportions, interesting design rules and when to break them is also a constant challenge.

For example, I was doing forging exercises to develop some hammering skills. The result was an interesting shape. I love long, thin pendants and my exercise piece was crying out to be used. By playing around with the shape, I was inspired by the flow of the metal to add a delicate blue green stone to highlight the liquid shape. The result was a gorgeous, elegant piece (in my humble opinion, of course).


Cheers!

Each month the Aspiring Metals team chooses a topic and each write about that topic on their blog. This month we want to know what inspires you, and where do you look for inspiration?

See what we have to say by visiting the blogs below:


Monday, September 19, 2011

A Special Project

When my sister announced she was going to get married, I immediately offered to make the rings. It is, after all, what I do and making things for others is one of my ways of showing love and support. I was thrilled when both of them accepted.

And so the fun began. The original plan quickly grew. Her fiance's aunt heard that I was planning to make their rings and wanted to contribute to the project. She sent a lovely old key chain, in an amazing shade of gold. My sister also wanted to incorporate a ring which our parents had given her for her 18th birthday, with a lovely diamond. And there was also a bit of new gold, which they had bought as an investment.

My challenge was to incorporate all the elements into a beautiful pair of rings, which would also be a symbol of their union. Oh, dear.

The first step was to prepare the metal. I melted the key chain and the ring, carefully poured into an ingot mold and laminated it down to a long strip measuring 1.6mm by 2.2mm wide. Since the mill is hand operated, my muscles got quite a nice workout. I also prepared some yellow gold wire, from the fresh investment gold.

The metal was then cut and shaped into rings. I didn't want to solder them, since a wedding ring should be a perfect circle, with no beginning, no end and no weak spot, like a solder joint. The alternative was to fuse them together, by carefully heating them just up to the melting temperature, so the ends would melt together, but removing the heat before the whole ring collapsed into a shining puddle.

For the diamond ring, I also fused the wires for the prongs onto the shank. And, let me tell you all, I am not fusing prongs again! It is too nerve wrecking, since the prongs tend to melt before the shank is hot enough to fuse.

The rings were then carefully sanded and polished. Once the surface was perfect, I gave them a matte, brushed finished, which looks very elegant and modern.

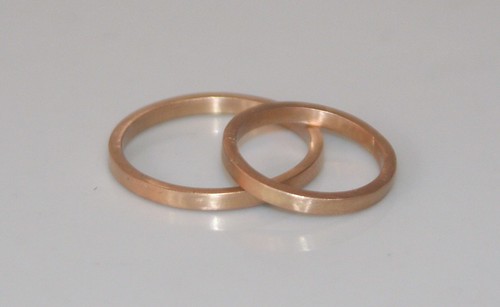
Here they are! Wedding rings without beginning or end. The gold represents the union of the two families, merged together by their marriage. From this, their own efforts shape their future, represented by the yellow gold, which is a fruit of their labor together. And everything is joined together seamlessly, supporting one another.

2.2mm 18k rose gold ring, 0.25ct diamond on 18k yellow gold prongs
Pair of 18k rose gold wedding rings

Thursday, September 8, 2011

Ice cream making in the small studio

While folks in the northern hemisphere are enjoying the last days of summer, the temperature is rising here in the south. And the humidity is going down. Way down - last week, we were down to 10% relative humidity, which is desert like (the World Health Organization recommends at least 60% for healthy living, so, yeah, very low).

The warm sunshine had me craving something smooth, tart and icy. Frozen yogurt, as a matter of fact. But the freezer was bare and I didn't want to leave the house just for my treat. Deb Stoner, however, taught me well: "we are jewelers and we can do anything." So here is how this jeweler made creamy frozen yogurt.


First, empty the only ice tray into a ziplock baggie (yes, the only one. Bachelorette living at its finest). Then, use your general duty hammer to bash it into smaller pieces. Mind you, don't use the mirror polished hammer. You never know what may mar it and it is nearly sacred in my studio.


Now, put the crushed ice in a barrel, fill it 3/4 up with water and add salt. I am using barbecue salt crystals, because that is what I had on hand. It is great for salt casting as well, with all the textures. Throw in a small pot of yogurt too, since that is the main objective of this.


To get creamy frozen yogurt or ice cream, it is important to churn it or stir it constantly as it freezes. Otherwise, you get a solid lump of frozen stuff and that is not good. Since I have no ice cream maker and I didn't really want to stir the yogurt constantly, I improvised: the tumbler. It is usually used to finish jewelry, by turning the barrel and pushing little steel balls against the silver, to strengthen and give it shine. Since it is slowly spinning around, it also works beautifully to churn my yogurt.


Half an hour latter, here we have a perfect pot of frozen yogurt, perfect on a hot day.

Note - rubber barrels don't really like ice and salt. Rinse it thoroughly before and after use and don't do this too often, otherwise the rubber may become dry and crack.

Sunday, August 28, 2011

Putting words into practice

Last week, I blogged about refining metal and why I feel that using every piece of scrap is important. This week, I want to share a piece that was made with this exact philosophy.

I had an awkwardly shaped piece of scrap that had been hanging around the bench for some time. It had been cut out between two oval bezels, so it had long, thin arms and a narrow central part. I thought I could use it for the backplate on a small pendant, but that would leave all the arms as scrap. I didn't like that idea.

Then, it spoke to me (yes, all metalworkers are nutjobs who listen not only to metal but stones as well). It said "I want to fly!" I could see the vague outline of wings, but it was still not enough for me. Then, as I was looking through my photo archives, I came across this image:


Perfect! I could see exactly how my little piece of scrap would fit. Of course, I altered the shape considerably (it is called artistic license, you know), but it all started here.

After refining the shape somewhat, soldering the hair pick and giving it a nice matte finish and burnished edges, my little butterfly was ready to fly off: